Snow Leopard Cake

Can you believe it’s been a year since this cake? Its always a scary reminder how quickly my nephew is growing up.

My nephews list of likes has recently expanded due to a certain aunty (😁) introducing him to the wonders of Nutella, he also really likes Oreos (what is it about nutrionally devoid food that makes it sooo delicious?!). However, he still wanted his cake to be vanilla and white chocolate.
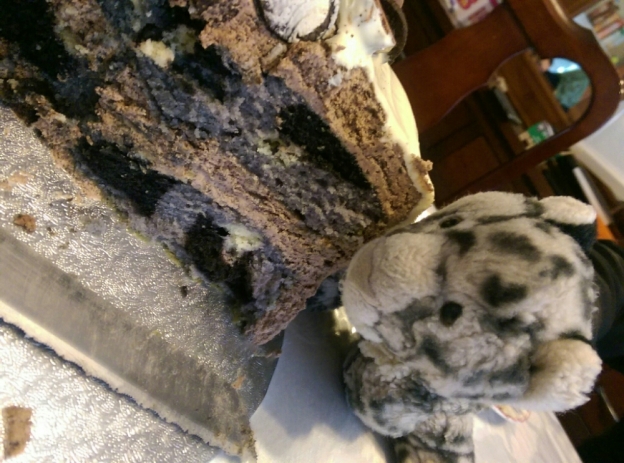
Apart from the usual computer games that most 9/10 year olds seem to be obsessed with, my nephew loves Snow Leopards and can tell you all the facts about them.

So a vanilla cake, with white chocolate, nutella, oreos and a hidden suprise of a snow leopard. This was actually a no brainer….

image

image

'snowy' inspecting the cake

For the cake I used the same vanilla recipe used in the Rainbow Cake:
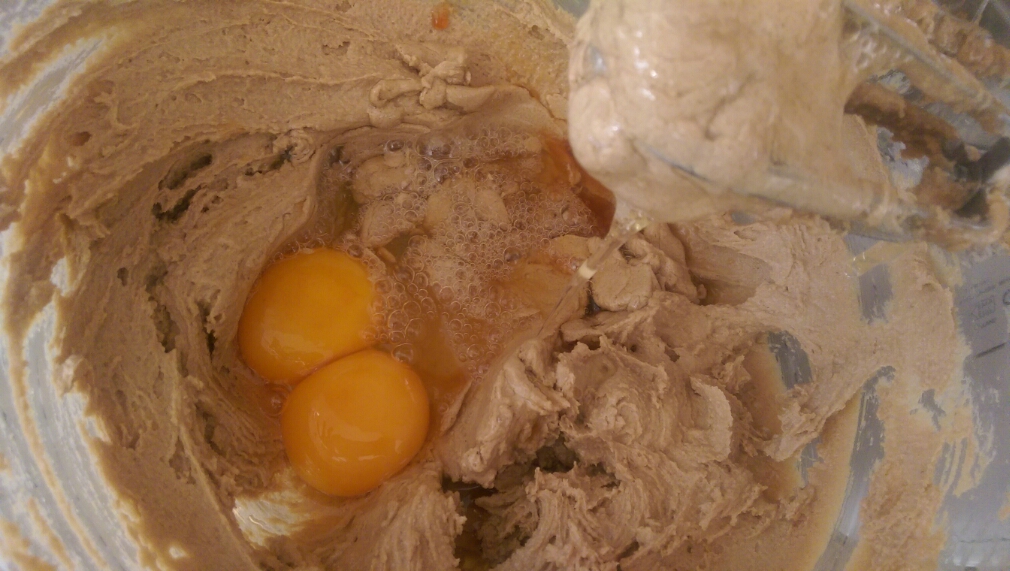
175g unsalted butter creamed with 250g golden caster sugar (cream for about 5mins til pale and fluffy, with golden caster sugar the mix will remain grainy).
Whisk in x4 eggs and 2 teaspoons of vanilla essence (I add each egg separately with a teaspoon of flour to prevent curdling).
Sieve in 250g self raising flour and 1 teaspoon baking powder, fold in gently.
Mix in 75g natural yoghurt.

I then separated the mixture 1/2 into one bowl with a small amount of Wilton black gel food colouring to get a nice grey, 1/4 with some cocoa powder and black gel colouring to make the mixture a dark grey and the remaining 1/4 I kept plain.

image

image

I spread a thin layer of the light grey mixture on the base of the cake pan. I then piped rings of the dark grey mixture on top

image

I then piped the plain mixture on top of the dark grey rings, pushing the nozzle into it so it fills the dark grey ring. Cover with the light grey mixture carefully

They were baked until a knife poked through the centre came out clean (fan assisted oven at 170deg).

To see if I had achieved the desired affect meant waiting until the cake was cut!

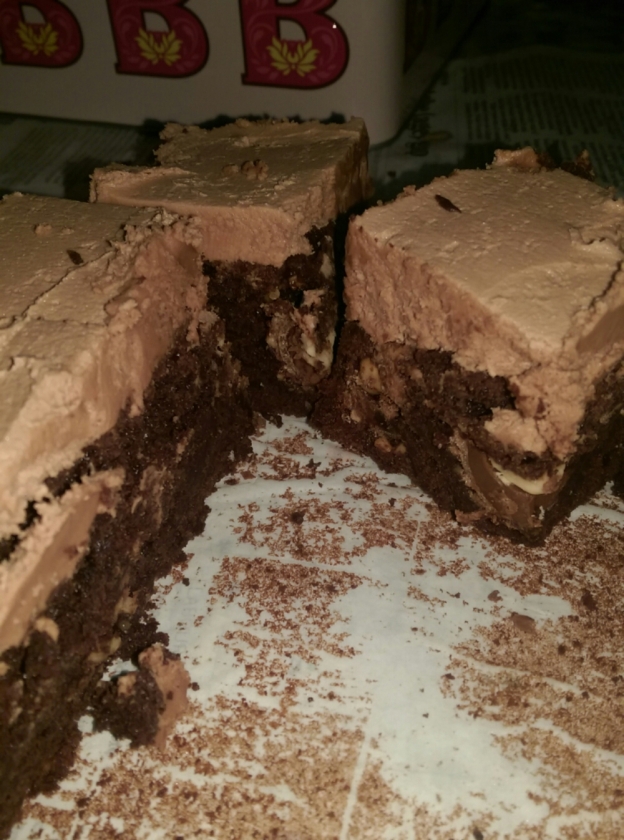
To decorate I made a Nutella-Oreo frosting.

image

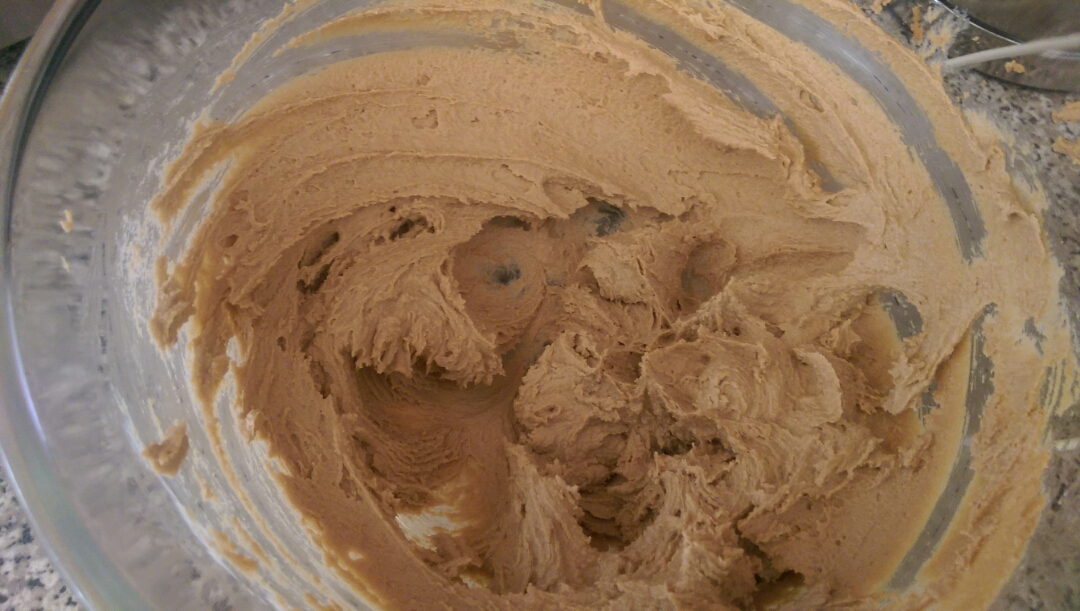
A 250g bar of unsalted butter was whisked until smooth, I gradually added 500g of icing sugar. Once fully incorporated, whisk for aprox 5mins til smooth and fluffy. Add a tablespoon or two of milk (until you achieve the consistency you want), I then whisked in 3-4 tablespoons of Nutella and a pack of Oreos which were blitzed in the food processor. The frosting became quite stiff so I added more milk til it had a spreadable consistency.

image

This frosting is amazing 😋. 

There was enough to fill and cover the cake with a generous amount of frosting (there was a lot of frosting,I could have saved it for another cake, but I know it would have ended up being eaten with a spoon :oops:).

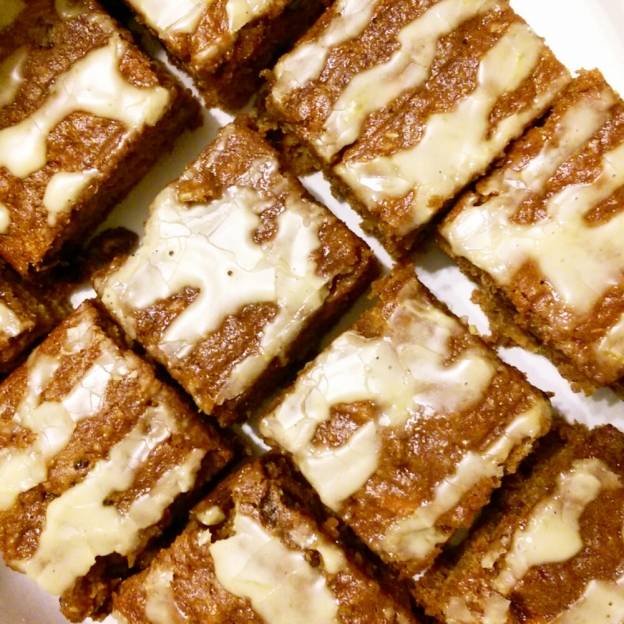
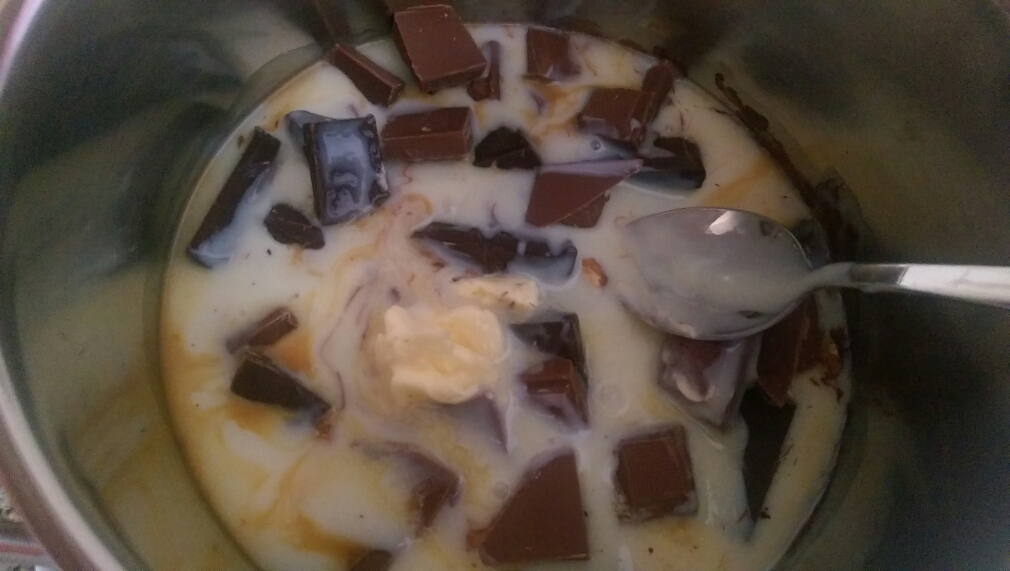
To finish the cake I poured over some melted and cooled white chocolate to achieve a dribbled effect and decorated with mini Oreos (can you believe they don’t sell these anywhere in the UK? I had to order them from Amazon for a silly amount of money) and the very delicious Cadburys Oreo bar.

image

I was really happy with the final cake and my nephew couldn’t wait to cut his cake.  He was sooo suprised with and loved the snow leopard design inside….

image

The nephew and snowy definitely enjoyed themselves :mrgreen:

image

Fat Free Cake

I have never been a fan of ‘low fat’/’fat free’/’low calorie’ desserts.

A slice of cake every now and then as a treat never killed anyone, right? Well that’s what I thought, ok nobody died, but one brownie turned into two brownies …and…yes I have no self control 😐

I made some adjustments to this recipe. I replaced the rapeseed oil with Apple sauce, making it fat free.

1 medium orange
140g raisins
140g dark muscovado sugar
2 eggs
125ml unsweetened apple sauce
115g plain wholemeal flour
1 tsp baking powder, plus a pinch1 tsp bicarbonate of soda
1 rounded tsp ground cinnamon
115g self-raising flour
280g finely grated carrots (about 375-400g carrots before peeling)

Ok, I lied, it’s not completely fat free, but naturally occurring fats in eggs aren’t too bad!

image

Zest and juice the orange. Mix the zest, raisens with 3 tablespoons of the juice and set aside

image

Separate the yolk/white of one of the eggs. Place and yolk with the other egg and whisk with the sugar until pale and fluffy. Tip in the Apple sauce and continue to whisk

Combine the remaining dry ingredients

image

Tip in the flour mix, half at a time, and gently stir it into the egg mixture

image

Fold the grated carrots and soaked raisens/zest

image

Whisk the egg white with a pinch of baking powder to soft peaks. Fold into the main mixture

image

Place the mixture into a lined/greased tin (I used a 20cm square tin), and into a preheated oven at 160 C for 45-60mins

I also got rid of the frosting and used a sugar icing drizzle.

Once cooled, I mixed three tablespoons of orange juice with enough icing sugar to produce a thick icing, this was then drizzled over the top.

image

I have to admit I was kinda worried when I cut it up and was ready to eat it, what if it was inedible?

image

😋

Those fears were short lived, the cake was delicious! I’m huge carrot cake fan and this did not disappoint.

Ferrero Rocher Brownies

I had a dilemma…cookie dough brownies ferrero rocher brownies or Biscoff brownies?! Tough one, right?

So I took it as a sign when I saw a picture of Ferrero Rocher Brownies on my facebook news feed. And as you may have noticed, I do have a bit of a Ferrero Rocher/nutella obsession (this, this and we mustn’t forget this 😋).

Place box of Ferrero Rocher in the fridge a few hours before you start.

For the brownies I used the Jamie Oliver recipe, which is my normal go-to recipe.

image

Brownie mix

image

Spread half the brownie mix in a prepared tin, using a sharp knife cut the Ferrero Rocher in half and place over the mix

Cover with the remaining brownie mix, and bake for 30-40mins; until a knife poked in the centre comes out almost cooked (shouldnt be too runny or come out clean).

Leave to cool in the tin.

In the meanwhile, make the dreamy nutella frosting.
Cream together 125g unsalted butter at room temp with 250g icing sugar, add a few drops of milk (as needed)to achieve a smooth consistency.
Add nutella to taste (at least 2tablespoons).

Once the brownies are cooled, spread the nutella frosting over. If you have any, which unfortunately I didnt, sprinkle with chopped hazelnuts. Leave to chill/set in the fridge for at least 2hrs.

Remove from the tin and cut into squares, I cut them into 25 squares.

image

image

Mmmmm 😍

Welcome Back Cake

My parents had been away for a few months on their annual migration to a warmer climate.

To welcome them back I wanted to make them something special …

(this was also the first cake I was going to make/eat in three weeks as I am trying to lead a healthier lifestyle; unfortunately 5 portions of cake and chocolate a day wasn’t a good idea and that explains why I haven’t blogged for a month!)

image

My Rose and Pistachio Cupcakes are a firm family favourite, so I knew a big cake version would be a hit, and after trying ‘Raspberry and Pistachio Slices’ from Mason Blanc I knew raspberries would compliment this cake perfectly.

For the cake I decided on a genoise sponge, as it was so easy to slice into layers last time, and I still haven’t found my cake slicer/layerer thingy.

Ingredients:

image

Cake:
100g unsalted butter
100g pistachios
300g golden caster sugar
6 tbsp semi-skimmed milk
6 large eggs, at room temperature
2 tbsp cornflour
175g plain flour

Soaking syrup:
2 punnets of raspberries (150g each)
Juice of half a lemon
2 tablespoons icing sugar

Icing
600ml double cream
2 tablespoons icing sugar sieved
2 tablespoons rose water (or to taste)
Pink/red food colouring (I used Wiltons gel colours in ‘rose’)

1) Place the butter and milk into a saucepan and heat until the butter has melted. Turn of the heat, and leave aside.

image

2)Grind the pistachios into a fine powder using a coffee grinder

image

3)Crack the eggs into a bowl and add the sugar, whisk for 10-15mins until the mixture has thickened and leaves a trail when the whisk is pulled out. As the cake doesn't have any raising agents this is important to give the sponge a bounce and make it rise nicely

image

4)Mix together the dry ingredients and seive into the egg/sugar mix. Gently fold in. 5)Pour the melted butter/milk mixture at the side of the bowl, again stir in gently til fully combined

image

6)Divide the mixture between two cake tins (or use one deeper and adjust cooking time). Bake at 170C for 20-25mins (or until a skewer comes out clean) 7)Once ready, remove from cake tin and leave to cool on wire rack

8)While the cakes were cooling I made a raspberry sauce to soak the cakes with.  This was made by mashing and seiving 2 punnets (150g each, I actually only used about 1.5 and ate the rest 😋).  The juice was heated with the juice of 1/2 a lemon and 2tablespoons of icing sugar.

image

Slice the cakes in half to get 4 layers

image

Brush each layer with the raspberry sauce

9) For the icing :Empty the cream with the icing sugar and whisk until at soft peaks, add the rose water to taste (I used two tablespoons, but add in small quantities until you get the level of rosiness you want) and the food colouring. Whisk a little bit more. Decorate cake as desired.

image

I wanted to do a naked cake with pretty edges, so piped the cream around the edges of each layer and just spread it in the middle and sprinkled some pistachios on top.

image

For the top of the cake I just spread the cream across and dotted some leftover raspberries on top, with a final sprinkling of pistachios

image

Ta-dah!

image

Mmmm... Delicious

Peanut Butter Swirl Brownies

Super fudgy brownies packed with peanut buttercups AND topped with more peanut butter.

Irresistible 😋

Ingredients:
Brownies
200g dark chocolate (I normally use store own brand or Bourneville as I find the high cocoa content chocolate makes the brownies too rich)
250g unsalted butter
80g cocoa powder
65g plain flour
1teaspoon baking powder
150g dark muscavado sugar
150g golden caster sugar
4 eggs
2 teaspoons vanilla

Peanut butter topping:
125g peanut butter (smooth)
2 tablespoons melted butter
3 tablespoons icing sugar sieved
1 teaspoon vanilla

image

Ingredients

image

Melt the chocolate and butter over a water bath, mixing occasionally

image

Sieve all the dry ingredients into a bowl

image

Mix and the chocobutter mix and dry ingredients together

image

Mix in the eggs(and vanilla), one by one. The mixture might look abit lumpy/cuddled, but by the time you get to the third/fourth egg, it will look silky smooth

image

Add the peanut butter cups, they don't have to be chopped up (I prefer them unchopped). Mix and then put the mixture in a lined brownie tin

For the peanut butter topping:

image

Mix in the ingredients until smooth

image

Swirl using a toothpick/knife. Place in a 160deg oven for 25-40mins (a knife poked into the centre shouldn't come out clean but not completely raw )

image

Ta-dah!

image

Once cool, remove from the tin and cut into slices

image

I split the mixtures between two pans, usually I make chunkier brownies in a single square cake tin and wouldn’t chop the peanut butter cups up.

However, this time I also wanted to do something abit special to gift some of these.
With the brownies in the second tin, using a heart cookie cutter I made brownie hearts 💕

image

Any extra brownie bits left over can be squished up and pushed into the cutter to make more hearts (or you could just eat them ;))

image

image

Hand made/personalised tags make a thoughtful finishing touch

image

Any excuse to use these boxes and my mini stampers

P.S. the mini reeses peanut butter cups are half price in Waitrose at the moment!

Revel Bars

As you may have noticed, I love making ‘bars’/’slices’. They are easy to distribute and package, and you tend to get more servings (I was going to say they last longer, but not in this house!)

I’m really into layer bars at the moment AND fudge, so was really excited to make these ‘revel bars’; an oaty base with a fudge centre and more oaty biscuit on top.

Ingredients:
1 cup (225g) butter
2 cups (300g) soft light brown sugar
2 eggs
2 teaspoons vanilla
2 1/2 cups (300g)plain flour
1 teaspoon bicarbonate of soda
2.5 cups (200g) quick-cooking rolled oats
1 can  (397g) sweetened condensed milk
175g milk chocolate/175g dark chocolate
1 cup (60g) chopped walnuts
2 teaspoons vanilla

image

image

Cream the butter and sugar, leave 2tablespoons of butter for the fudge

image

Whisk in the eggs and 2tsp vanilla

image

Add the dry ingredients and mix

image

Put the 2tablespoons of butter, condensed milk, chocolate and 2tsp vanilla into a pan. Heat until the chocolate has melted.

image

Take fudge of the heat once ready and add the walnuts

image

Press 2/3 of the biscuit mixture into the cake pan, I used a 20cm square cake pan

image

Pour the fudge over and spread evenly

image

Dollop blobs of the remaining biscuit mixture over

image

Bake in the oven at 180deg for 20mins/until the biscuit topping is golden brown

Leave to cool in the cake tin.  Once cooled, place in the fridge to set the fudge centre for at least 2hrs/overnight.

image

Cut into squares

image

These are sooo good.  The oaty biscuit layer has an almost cake like consistency and the fudge layer…is well fudgy.  Sooo addictive!

image

I found these super cute boxes on eBay 😍

Suprise Cakes

I love cakes that suprise you when you cut into them.

image

hidden 'star' and 'butterfly' cupcakes

image

hidden red velvet heart cake

image

rainbow pinata cake

So I wanted to make a cake to take to a dinner, something simple but would also be fun.

I decided on a hidden heart bundt cake.

First I made the cake for the ‘hidden heart’:

image

I used my regular vanilla cake recipe:
175g unsalted butter creamed with 250g golden caster sugar
Whisk in x4 eggs and 2 teaspoons of vanilla essence
Sieve in 250g self raising flour and 1 teaspoon baking powder, gently mix in 75g natural yoghurt

image


I divided the mixture into three and coloured using gel colours

image

I then placed in a square cake pan and marbled the mixture

Once cooled I then used a heart cutter

image

I then made another batch of the cake mix:

image

coat the bottom of your Bundt pan with some of the cake mixture

image

Place the hearts, upside down. Put the remaining cake mix on top and bake (180deg, aprox 45mins)

image

Leave to cool 🙂

To decorate, originally I planned to drizzle with white chocolate, unfortunately, the white chocolate seized when I was melting it (this always happens to me :twisted:). As I didn’t have anymore chocolate I used sugar icing and sprinkles:

image

Using the whole cake mix for the hearts made soo much more cake than needed, you could half the quantities or freeze half the cake.

image

..Or make cake truffles 😋.. by crumbling the cake and mixing in with some buttercream icing (i used the seized up white chocolate)

image

image

maybe not the best colour choice with the yellow!

Halloumi, Aubergine & Mushroom Burger

I was thinking about carrot cake the other day, as one does, and started to think about Nando’s.

It may sound crazy, that a mass produced cake in a semi-fast food place is one of my favourite carrot cakes, but its seriously good. Yummy moist cake with just the right amount of spice, dreamy frosting and that serving of clotted cream!

This post isn’t about carrot cake though!

Thinking about Nandos got me thinking about their halloumi and mushroom burger. So I decided to make my own 🙂

image

The bread:I normally get it in their bread rolls. As brioche rolls seem to be the burger bread of choice at the moment, I thought I would use them. Strangely enough I couldn’t find them in the supermarket, so decided to make my own.

I used this recipe which was easy to follow.

image

They do take a bit longer as they have to be refrigerated and then left to reach room temp and rise.  However, this can be worked into your day, I made the dough in the morning, put it in the fridge before I went out and then took them out when I got home and by the time I started to cook the filling they were ready to bake.

The side:Before getting the burger ready (and baking the brioche rolls), I put my spicy sweet potato chips in the oven.
These were made by peeling and chopping 2 sweet potatos, soaking them in cold water (to remove some of the starch) for aprox. 30mins.  They were then drained in a collander and dried off with a kitchen towel.  They were placed in a bowl and mixed with 3 tablespoons of harissa paste. They were then spread evenly over a tray and baked for 45mins (turning half way through).

image

The vege/cheese:I was tempted to buy a Nandos marinade for my vege, but luckily I came across this recipe from Ramsons and Bramble, which also inspired me to use aubergine in the burger.

I made a few adjustments for the marinade:
-juice & zest of half a lemon
-2 teaspoons of cider vinegar
-4 teaspoons garlic paste
-5 tablespoons olive oil
-1 tablespoon harissa paste
-2 teaspoons soy sauce
-lots of freshly ground black pepper
All ingredients are placed in a bowl and mixed.

This marinade is sooo good, I’m so happy I made this instead of using a store bought one.

image

Once the aubergine was fried in olive oil it was placed in a plate with the marinade

image

the mushrooms after being smothered in the marinade

To construct the burger, after slicing the brioche roll, chilli jam was spread over the base and covered with a leafy salad. I placed the fried halloumi, a slice of aubergine and the mushroom on top.

This was served with the sweet potato chips.

image

Delicious!

Hazelnut Latte Cake

Weird fact…I have four sisters and they are all born in February.
So yes, February isn’t a good month for healthy eating (or at least I have an excuse for overindulging?)

I saw a picture of this cake on the BBC Good Food instagram as a sneaky peak into what was coming up in their Feb issue, and bought the magazine the minute it hit the shelves.

I decided this cake would be perfect as a joint celebration cake for them (and sent a pic and ate an extra slice for my sister who lives abroad).

image

The recipe is finally up on their website so I can now share it with you all 🙂

The Cake

The sponge is a Genoise, this is the  first time I have made a genoise; its a slightly different technique but fairly straightforward.

image

Put the butter, milk and coffee powder into a small pan and heat gently until the butter has melted. Set aside.

image

Place the eggs and sugar in a bowl and whisk,for aprox 10-15mins,until the mixture has thickened and leaves a trail when the whisk is pulled out. As the cake doesn't have any raising agents this is important to give the sponge a bounce and make it rise nicely

image

Mix together th century flours and salt and sieve into the egg mixture, gently fold in

image

Sprinkle the chopped hazelnuts on top and gently fold in

image

Pour in the warm milk mixture at the side of the bowl, and gently fold in until there are no longer any darker streaks

image

Divide the mixture between the pans and once cooked leave to cool

The cake itself feels very different to a normal sponge, it seems to have a slightly denser structure.

The Syrup
I couldn’t find my cake slicer so had to use a large serrated knife and the aid of my rotating cake plate.

I was quite impressed as even with a cake slicer my layers don’t normally come out even, the dense structure of the cake definitely helped!

image

Once the cakes were cooled and cut, it was time to coat the layers with the coffee syrup.

I made my syrup without the alcohol. I found I needed to make double the quantity.

image

The Frosting

Nutella + Mascarpone = OMG

It might be getting boring now how in every one of my posts I describe the frosting as the ‘best ever’, but seriously, this is!

It sooo easy to make and it tastes absolutely dreamy.

image

The layers are sandwiched together with the frosting

image

The remainding frosting was spread over the top and sides of the cake

image

I used a decorating comb to give the ridged effect

I sprinkled the hazelnuts at the bottom, I didnt toast them with the sugar as the recipe states (I couldn’t be bothered).

The Topping
The showstopping finish to this cake is a beautiful latte pattern

image

But mine looked more like a mess…

image

😳

I decided to salvage my cake by smoothing it over which gave a pretty marbled effect

image

I was really happy with how this cake looked, fine, it doesn’t look as pretty as the magazine version, but was still impressive.

image

And most importantly, it’s one of the best cakes I’ve ever eaten let alone made!

image

The hazelnut sponge is perfect with a crunchy texture from the chopped hazelnuts and a rich coffee flavour from the syrup.  The frosting, as I have already described, compliments it perfectly and the coffee cream on the top brings all the flavours together.

Its the kind of cake you would be happy with if you bought a slice at a nice patisserie.

image