Category Archives: biscuits

Revel Bars

As you may have noticed, I love making ‘bars’/’slices’. They are easy to distribute and package, and you tend to get more servings (I was going to say they last longer, but not in this house!)

I’m really into layer bars at the moment AND fudge, so was really excited to make these ‘revel bars’; an oaty base with a fudge centre and more oaty biscuit on top.

Ingredients:
1 cup (225g) butter
2 cups (300g) soft light brown sugar
2 eggs
2 teaspoons vanilla
2 1/2 cups (300g)plain flour
1 teaspoon bicarbonate of soda
2.5 cups (200g) quick-cooking rolled oats
1 can  (397g) sweetened condensed milk
175g milk chocolate/175g dark chocolate
1 cup (60g) chopped walnuts
2 teaspoons vanilla

image

image

Cream the butter and sugar, leave 2tablespoons of butter for the fudge

image

Whisk in the eggs and 2tsp vanilla

image

Add the dry ingredients and mix

image

Put the 2tablespoons of butter, condensed milk, chocolate and 2tsp vanilla into a pan. Heat until the chocolate has melted.

image

Take fudge of the heat once ready and add the walnuts

image

Press 2/3 of the biscuit mixture into the cake pan, I used a 20cm square cake pan

image

Pour the fudge over and spread evenly

image

Dollop blobs of the remaining biscuit mixture over

image

Bake in the oven at 180deg for 20mins/until the biscuit topping is golden brown

Leave to cool in the cake tin.  Once cooled, place in the fridge to set the fudge centre for at least 2hrs/overnight.

image

Cut into squares

image

These are sooo good.  The oaty biscuit layer has an almost cake like consistency and the fudge layer…is well fudgy.  Sooo addictive!

image

I found these super cute boxes on eBay 😍

Brownie Caramelita

What do I like love more, caramelitas or brownies?

I couldn’t decide between the chewy, caramely, oaty caramelitas (and some may say healthy, oats and pecans are known to lower cholesterol and pecans are good for flagging energy levels, I will ignore the rest of the obesity/diabetes inducing ingredients :p) and fudgy chocolatey brownies.

So I decided to combine them together to make this amazing bar.

image

I prepared the caramelita biscuit and brownie mixture (I made half the amount, no nuts/fruit).

image

I baked the oaty base for 10mins:

image

Then covered with the brownie mixture, and baked for 20mins:

image

I then smoothed the caramel on top and sprinkled the chocolate chips and pecans:

image

And crumbled the remaining oaty biscuit dough on top, before baking for a further 20mins:

image

Once cooled, I left it in the fridge overnight.

image

image

Omg… These are amazing!

The thin brownie layer is just enough to give it that fudgy hit, and compliments the gooey caramel and caramelised pecans gorgeously.

New fave? Me thinks so!

Caramelitas

I follow a few American foodies on Facebook, Instagram and blogs and love the different slices/bars they make. They look really enticing with the layers of pastry/brownie/caramel/nuts/jams/cookies/cheesecake etc etc.  One of my early food memories is a Tri-Level bar my sister made after a holiday to America.

image

these images were taken from the wonderful http://chocolatechocolateandmore.com/

My main problem is even though there are numerous recipes out there, I find it really confusing converting cups to grams, as there are loads of different conversion tables which all come up with different results.

I visited the stall, at the Good Food Cake and Bake Show, for the Outsider Tart who have brought their yummy American baked goods to the UK.  I was able to try a few of their slices and my favourite was an oaty caramelly bar.

I later saw these on instagram and knew I had to make them.

Ingredients:
(made 24 squares)
240g/2 cups plain flour
160g/2 cups quick cooking oats (I used Quaker Oats
1 teaspoon bicarbonate of soda
¼ teaspoon of salt
200g/1 1/4 cups light brown sugar
240g/1 cup unsalted butter
100g chocolate chips
60g chopped pecans
400ml of Caramel (I used tinned Nestle Caramel)

(recipe adapted from: Brown Eyed Baker and Roxanas Homebaking, I used Roxanas conversions from cups to grams and made a few adaptations as I went along, still not 100% happy with the conversions but it turned out well)

Method:
1)Preheat oven to 180 C and prepare tin (I used my brownie tray, which is 13.5” by 8”)

2) cream the sugar and butter, add the flour/bicarb/salt and mix, once combined add the oats  and mix until it forms a crumbly mixture

image

3) cover the base of the tin with ¾ of the crumble mixture, spreading so its even and bake for 10mins

4) take out of the oven and sprinkle with the chocolate chips and pecans, then pour over the caramel, and spread evenly using a spatula

image

image

5) crumble the remaining crumble mixture over the top evenly

image

6) bake in the oven for 10-15mins, til lightly browned

7) leave to cool, once at room temperature, leave in the fridge for two hours/overnight.  Cut into squares and serve (return to room temperature before serving, though if you can’t wait you can try one…or two).

image

image

These were absolutely delicious and really easy to make.
The oaty biscuit base and topping is buttery and has a caramelly taste from the brown sugar, and the caramel/chocolate/pecan filling compliments it so well.

image

Mr Kipling Eat Your Heart Out

I love Viennese Whirls, who doesn’t? Buttery, melt in your mouth biscuits, with a creamy filling and jam. Mmm…

Mr Kiplings recent seasonal offerings, gingerbread and mince pie (both are amazing but the mince pie one is better in my opinion), had me craving these home made versions and meant I got to use my favourite kitchen toy.

image

This recipe from the Hairy Bikers makes the most moreish Viennese Whirls.
They are also very easy to make, which is great, as you will want to make them often.

Biscuits
– 250g/9oz very soft butter
– 50g/2oz icing sugar, plus extra to decorate
– 250g/9oz plain flour
– 50g/2oz cornflour
– ½ tsp pure vanilla extract
For the filling
– 100g/3½oz soft butter
– 200g/7oz icing sugar, plus ½ tsp for dusting
– few teaspoons of milk
– ½ tsp pure vanilla extract
– 75g/3oz seedless raspberry jam

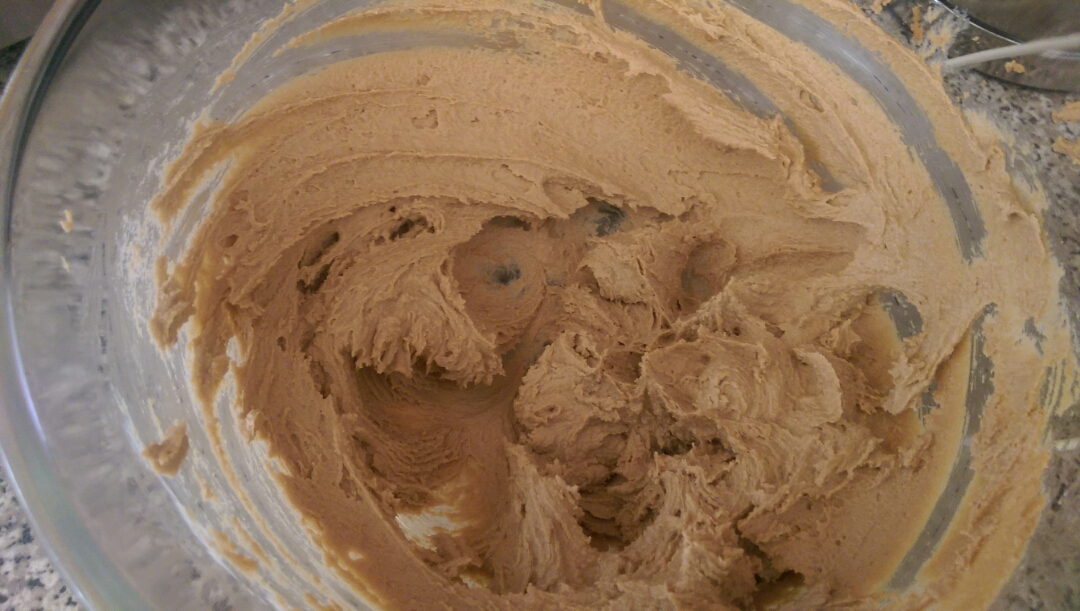
Combine all the ingredients for the biscuits using your electric whisk/food processor until smooth and completely combined.

Now this is where my favourite toy comes out. The first time I made these I found them really difficult to pipe and my hands really hurt, so I gave up and just made them into rounds. Same taste but they looked kinda boring.

I was gifted with this Kuhn Rikon Cookie Press. It effortlessly makes cute little shaped biscuits. I absolutely love it and can’t recommend it enough.  It’s so easy to use/clean and the resulting biscuits look soo amazing.  However, I’m not a huge fan of the recipes that were included in the box, but it’s perfect for Viennese Whirls, no painful piping and you still get beautiful biscuits. 

image

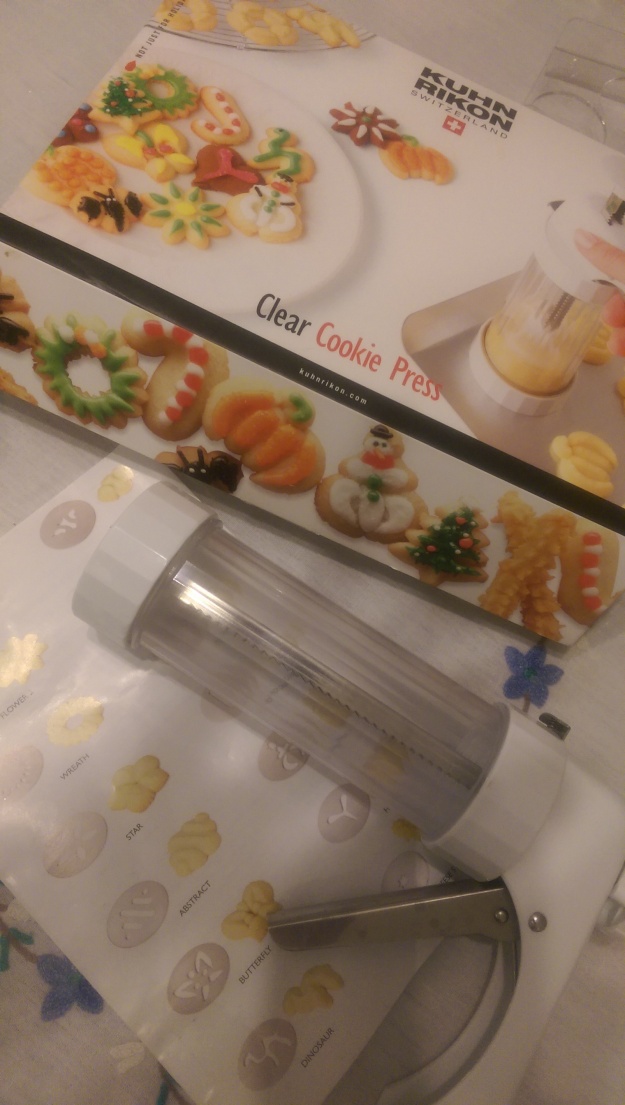
Included are several discs to make different shapes/patterns

image

my favourite are the flower and hearts

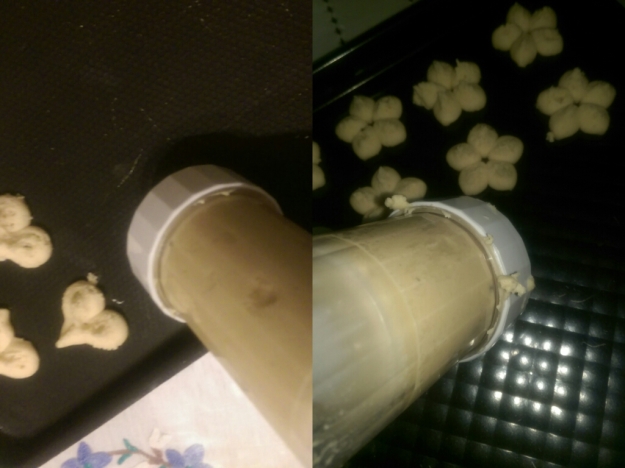
The biscuits come out more consistently if the trays are chilled, I also find it easier with the textured trays as pictured.

Bake until the edges are golden.

These biscuits alone are AMAZING. So buttery and moreish.  It’s a good job with the cookie press they are small so you get a lot more than the 18 sandwiches suggested in the recipe!

Make your buttercream and pipe on to a biscuit, put some jam on top and sandwich with another biscuit.  A sprinkling of icing sugar and eat!

image

The recipe is incredibly versatile and you can add different flavouring to both the biscuit and buttercream; the ones pictured are a vanilla biscuit with a mocha buttercream.
You can also substitute the jam with nutella/caramel etc to compliment your flavour combo.

You can also substitute the cornflower with custard powder, filled with vanilla buttercream and jam… Simply divine!

They can also be dipped in chocolate to be extra indulgent.

image

Or if you want something abit ‘lighter’ you can omit the buttercream/filling.

image

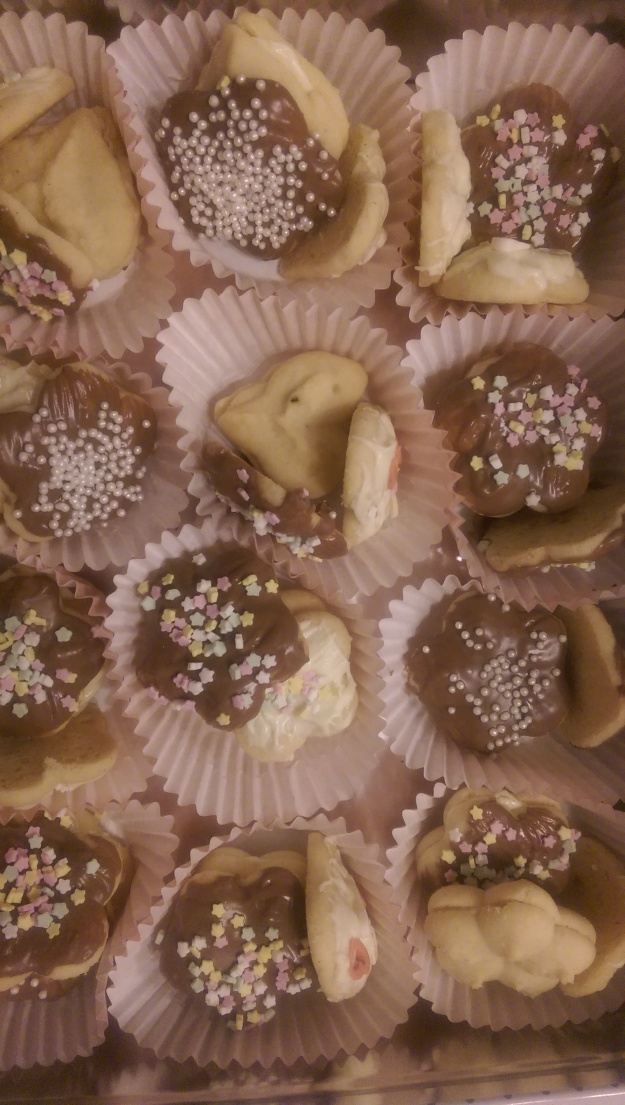
The Maryam butter biscuit selection box:coated in chocolate and sprinkles

image

They can also be made vegan/dairy free by using dairy free spread (e.g. Vitalite sunflower spread). They do take about 5mins longer to bake. Here are some I made sandwiched together with jam:
image

P.S. I was in Lakeland recently and found this cute springtime cookie disc set … And it fit in my Kuhn Rikon press! Haven’t had a chance to use them though.

P.P.S. they don’t seem to be selling the Kuhn Rikon Cookie press at Lakeland anymore,however, they have this OXO set, and its £5 off…yay!

Mendhi Hands

image

Continuing with what I made for my dessert table.
I saw these on Instagram or pintrest and knew I had to make them.  They were a massive hit with the kids and adults alike.

The idea is you leave the hands out with some icing pens and your guests decorate their hands with their own mendhi designs.

Even though this was one of the most simple things I made, it was definitely my favourite.

I used my favourite custard shortbread recipe:
250g plain flour, 50g custard powder, 100g caster sugar combined, then crumbled into breadcrumbs with 250g cubed butter , and kneaded until it combines. Chilled in the fridge before rolling for approx 30mins

image

I bought these hand cookie cutters from a kitchenware shop:
image

I rolled out the dough and cut them into different sizes hands

image

Then baked in the oven at 160deg until just golden brown on the edges (aprox 15mins).

While the hands were baking/cooling, using white fondant icing I made some hand toppers.  Once the hands were cooled, using raspberry jam brushed on to the hand biscuits, I stuck the fondant hand onto the biscuits.

image

Mmm.. custard biscuits with a tangy raspberry jam and sweet fondant topping!

On the day these were left out on a tray with a few tubes of chocolate writing icing tubes.

image

They were meant as an activity for kids but were enjoyed by everyone.

image

image

image

image

Not only did they look fab, they tasted awesome (and the leftovers were most appreciated at breakfast the next day).

They are a fun addition to any mendhi/henna party.

Dream House

Ever since I’ve got into this baking thing… I’ve been telling myself I have to make a gingerbread house.

I absolutely love gingerbread houses. I could spend hours on pintrest looking at the gingerbread mansions/villages/cities.

Feeling inspired by the season (and bakedbyH’s gorgeous house, I can’t believe that’s her first attempt) I decided this was the year and made my template

image

I decided to go with a chocolate gingerbread house and used this recipe, substituting 50g of plain flour with cocoa powder. I also added a teaspoon of ground cinnamon and half a teaspoon of all spice.

image

Mixing the wet and dry ingredients

image

all mixed up and ready to roll

I’m not really sure why but I always thought making gingerbread would be really difficult but the dough was ready pretty quickly and no chilling required.

The dough itself was quite greasy, but the made it easy to roll and no messy/stickydough fingers.

image

image

image

I decided my house had to have windows and used hardboiled sweets to fill the heart cutouts.

Some of the houses I’d found online had the most beautiful stain glass windows and I really wanted to recreate them (ambitious much?!).

image

Unfortunately, I’m a proper weakling, and didn’t get very far bashing my sweets with a rolling pin, so ended up having to put whole sweets of the same colour and hoping for the best.

I left the them to bake for 5mins longer than advised just to make sure they wouldn’t be too soft.

After taking them out while still fingerburning hot, I cut around the templates as the dough had spread abit during baking.

image

My Windows worked... Yay

I decorated the pieces before constructing the house. I used royal icing, jelly tots and some white chocolate heart sprinkles.

image

And chocolate buttons to make a slate effect for the roof

image

Now the scary bit…construction….

image

I piped stiff royal icing and held the pieces in place until slightly set, and reinforced it with more royal icing along the joints from the inside and outside.

I wanted mine to look like my dream house from when I was a kid, unfortunately, my artistic abilities are still the same as when I was a kid.

And this is what I ended up with

image

image

I would definitely live in that house! But will be happy to just eat it for now.

As the house I made was smaller than the one on the recipe, I used the extra dough to make cookies, which gave me an opportunity to use my new ‘baked by maryam’ stamp 😁.

image

Jammy Dodgers

Jammy dodgers are my favourite shop-bought biscuit… I’ve tried all the different varieties.. chocolate/custard and jam/toffee… but nothing can beat the classic raspberry jammy dodger

Theres something special about that chewy raspberry jam-like filling. I remember eating the as much of the biscuit part first and saving the jammy middle for later. MMMMmmm 🙂


Other jam sandwich type biscuits don’t come anywhere close (though I will happily eat them .. I’m not one to discriminate).

When I came across this recipe for Jammy Dodgers I knew I had found it, or as close to Jammy Dodger goodness as I was going to get. A raspberry caramel filled short bread biscuit; chewy juicy raspberry goodness in a buttery biscuit… irresistible!

I always felt that the shortbread biscuit in Jammy Dodgers let them down, so I decided to use a custard shortbread (taken from ‘John Whaite Bakes’):

250g plain flour, 50g custard powder, 100g caster sugar combined, then crumbled into breadcrumbs with 250g cubed butter , and kneaded until it combines. Chilled in the fridge before rolling for approx 30mins

After rolling the dough out and cutting into rounds, I used a star and heart cutter on half of the rounds to make the ‘window’, then baked until they were golden brown (approx 15-18min at 180deg).

The caramel was surprisingly easy to make, I did slightly over heat mine so it was very thick as it cooled, next time i would follow the timings advised better. It does keep very well in the fridge.

Once cooled, they were filled the caramel, if the caramel is too thick when cooled, it can be microwaved to reach the desired consistency, but be careful as it gets very hot!

The custard shortbread is sooo buttery and yummy, not too sweet, so balances out nicely with the caramel. Unfortunately, I find it does not freeze very well and I find it really crumbly when used from the freezer.

The quantities as above made about 36-40 sandwiches, with enough caramel left over the make another batch a few weeks later.  They stayed fresh and crispy for a week in an air tight container.

🙂

Baci di Dama

20131224-214939.jpg

That’s Italian for the most amazing biscuits ever

Small bites of hazelnutty goodness sandwiched together with Nutella.

Before making these for myself, I had never actually tried these biscuits. I had seen them on a cooking programme on TV, I didn’t even know their name, I just knew they were bite sized Italian hazelnut biscuits with a hazelnut cream filling. They looked and sounded delicious. I knew they would be the most amazing biscuits. All I had to do was find out what they were.

A few google searches with vague descriptions were fruitless. I couldn’t find them on the programme’s website. Looking through my many cookbooks didn’t help. I guess I was just going to have to give up on these…

Now I don’t normally read let alone attempt recipes that don’t have pictures. I was slightly, no very, disappointed that my new cookbook didn’t have a picture for every recipe. Yet something drew me to this recipe, and as I read the description I knew I had found them!
(Despite not having a picture for every recipe I highly recommend this book, everything I have made so far has come out perfectly, I was probably over exaggerating how few pics it has, and all the pictures are mouthwatering!)

The recipe is very straight forward. I used my hand held electric whisk, not food processor, as it’s less hassle to clean.
The recipe says to leave the dough in the fridge for at least 30minutes. The first time I made these I left them in the fridge all day and still found it easy to form the biscuit balls.
There was no way I was going to weigh out the balls for them to all be the same (I am marginally OCD but that’s just taking it to the next level!) I think they look more homemade when they are slightly different shapes and sizes anyway.

20131224-215706.jpg
The recipe makes A LOT, which shouldn’t be a problem as they are incredibly moreish.
The first time I made these I froze half the dough and still ended up with about 40! The dough freezes very well and they tasted just as good than when made fresh.

20131224-215906.jpg
I also didn’t make my own gianduja filling, it is probably worth the effort, and I may attempt it in the future, but for now I’m sticking to Nutella.
More difficult than waiting for the dough to chill is waiting for the biscuits to cool so they can be sandwiched together. Obviously a good time to try them out, they taste really good warm (smother them with Nutella when they are warm…it goes all melty and messy..mmm). They taste really good cooled and without the Nutella as well (it’s probably a good thing this recipe makes a lot!)

20131224-221957.jpg

These are one of my favourite biscuits at the moment, crunchy, nutty and gooey (and bitesized, which means you can eat more without feeling guilty/greedy).

They go really well with a hot mug of coffee 🙂

And they make a great homemade gift

20131224-222009.jpg

P.S. It actually means ‘ladies kisses’ but I prefer my translation 🙂

It’s the most wonderful time of the year..

I love winter

I love the chilly,frosty mornings

The naked trees showing off their physique

Snow

Hibernation

Pretty Christmas lights and the gorgeous shop fronts filled with enticing delights

Gloves/mittens and fingerglovemitten hybrids

Snow

Christmas movies

Walking through quiet foggy roads

Did I mention snow?

The holiday season is upon us (earlier and earlier so it would seem) when the supermarkets stock their shelves with yummy Xmas treats, gorgeous gingerbread houses, panatonne, stollen,mince pies, Yule logs and mouthwatering continental biscuits.

20131217-225036.jpg

One of my favourites are ‘Zimtsterne’, German cinnamon star cookies. They are a macaroon type biscuit with a smooth,crunchy meringue topping. The warming cinnamon with the crunchy sugar is a definite winter winner.

After seeing a recipe for them in the December Goodfood magazine I decided I had to make them. I had a look at a few other recipes online, they all seemed pretty similar, and this recipe yielded the least.

To make the dough was fairly easy, I was slightly concerned about over/under whisking the egg whites, but I think I got the right balance.

The instructions said to roll the dough between two pieces of greaseproof paper, this sounded abit fiddly to me, so I placed the dough to chill for a while and used plenty of icing sugar and didn’t have any issues.
The stickiness of the dough did help when cutting the stars out as they stuck inside the cutter and were easily pushed out onto my tray.

For the topping I piped it on to keep it tidy and though this would be the easiest way. In total I made about 45 stars (I probably could have made about 10 more if I didn’t eat so much dough, it’s divine!)

After about 12mins I took them out, I was disappointed to see the topping of a few of them had cracked. But on the whole they looked pretty good.

20131217-225217.jpg

Taste wise, the biscuits themselves were very nice, a soft yet slightly crunchy consistency,but could have done with more cinnamon, if I remake these I would add 1-2 teaspoons more.

The topping had a nice crunch, but possibly I put too thick a layer as they were still soft underneath. Next time I would brush it on with a pastry brush. Or possibly in the shop bought versions I’ve tried they use royal icing?

They went down very nicely with my cinnamon flavoured coffee the next day … And the flavours of the cinnamon and ginger were slightly stronger 🙂

Keep an eye out for more season bakes 🙂

I can sing a rainbow…

Sing a rainbow
Sing a rainbow too.

Red and yellow and…

Ok I can’t sing…an anything .. let alone a rainbow

However, I can bake a rainbow

20131211-165442.jpg

I’ve had my eye on rainbow cookies for sometime, after falling in love with some super piñata rainbow cookies. So when a tutorial popped up on my Facebook feed a few weeks ago, my rainbow cookie obsession was back.

Being me, I couldn’t just do squarish rainbow cookies and decided it would be a great excuse to use my new cookie cutters (I got them from ebay).

To make the dough it was easy enough, some effort was needed to knead the gel colours in…

20131211-170240.jpg

Once all the layers were stacked up (I had to make an extra layer so it would fit the size of my cookie cutter, I did this by combining my left over pink and yellow to get a nice orange), and the cookies were sliced, I used my cutter to make my cookies that extra bit awesome

20131211-171100.jpg

20131211-171050.jpg

They did take a bit longer than stated in the recipe, around 20-25mins, possibly mine were thicker, and out they came

20131211-171959.jpg

Using the left over dough I made some marbled cookies as can be seen in the pictures

These were a lot easier to make than expected and they look really impressive (even if I do say so myself)

Many thanks to iced gems for a great tutorial

20131211-173225.jpg